Schedule
The Schedule feature allows you to deliver or remove a feature at a specific date and time. This is useful for releasing new features during holidays or special promotions and removing temporary features afterwards.
How the schedule works
When using Bucketeer Operation with the Schedule condition, you can manage your flags based on specific dates and times. Once Bucketeer receives the SDK request, the schedule condition checks if the specified date and time have been reached. If they have, the operation to enable or disable a flag variation is executed.
To use the schedule condition, you must always select a future date and time to schedule the operation.
The schedule feature supports multi-scheduling, allowing you to create a chain of scheduled operations. This makes it easier to visualize and configure the flag schedule. For example, you can enable the flag (turn it On) on weekends and disable it (turn it Off) on weekdays.
Setting up operation with schedule
To enable or disable a feature flag using the schedule option, follow these steps:
- Go to the Operation page.
- Click the + New Operation button and select Schedule.
- The New Operation panel will appear, displaying the current flag state (On or Off).
- Under Schedule, select the operation's final flag state (On or Off) and set up the date and time. Remember, you need to choose a future date and time.
- (Optional) Add more schedules using the + Add Schedule button.
- After adding all the schedules, click Create Operation.
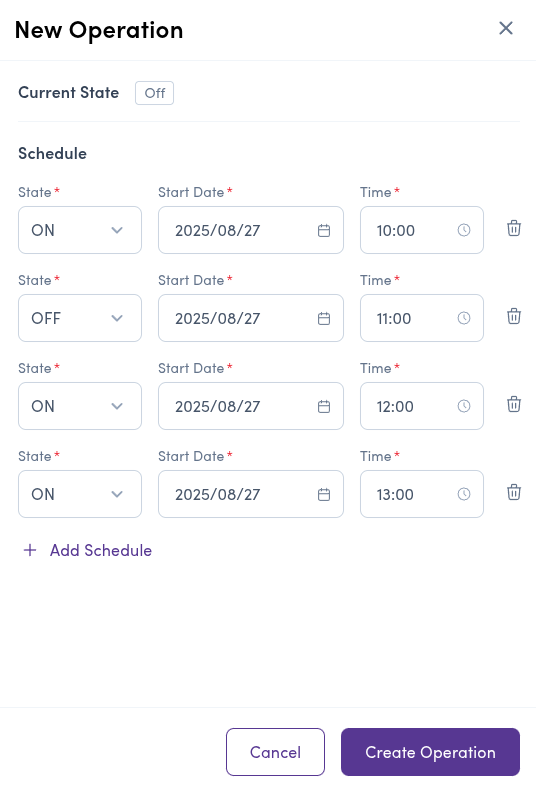
Bucketeer does not restrict the flag state selection when using multi-schedule. You can add multiple schedule operations in a row to enable the flag, and Bucketeer will not show any warnings. Ensure you are selecting the correct states when creating a schedule.
The image below shows an example of a multi-schedule configuration. Notice that two On operations were used in sequence without errors or warnings.

Managing schedules
After creating a schedule, it will be active and available in the Operation panel. Each schedule displays the created date and all associated operations, with the respective flag state and date and time for each schedule. The following image shows the progress information for the schedule created in the previous section:

While active, you can edit, stop, or delete the schedule:
- Edit Schedule: Change each operation's status or date and time. After submitting the modifications, the schedule remains active, displaying the last update date and time.
- Stop Schedule: Stops the schedule, preventing future scheduled operations from being performed. The schedule is finished.
- Delete Schedule: Stops and removes the schedule information from the server. Use this option carefully.
Schedule lifecycle
When you create a schedule, it will be active and available in the Active tab in the Operation panel.
When the first scheduled operation is executed, the flag state is changed, and the schedule progress information is updated. Instead of showing the creation date and time, it displays the last flag state update date and time. The same happens for multi-schedule after each operation.

After performing all operations, the schedule moves to the Finished tab. In the Finished tab, you can view operation details, listing all operations performed throughout the schedule lifecycle, or delete the schedule.
