Triggers
Flag triggers are a feature that Bucketeer provides to let you change the flag's state (ON/OFF) by calling a URL. As a result, you can use this option to enable or disable flags during CI/CD (Continuous Integration/Continuous Deployment) pipelines or based on an APM (Application Performance Monitoring) integration.
On the Feature Flag details page, select the Triggers tab at the top to check the existing triggers related to the current feature flag or add a new one.
How to use triggers
You can integrate triggers with any tool capable of performing a POST request. Using such integrations, you can enable or disable flags based on specific operational health thresholds or when you receive specific alerts. You can link each flag to one or more triggers used by one or more tools or alert systems.
One common integration of triggers is with APM solutions, such as:
APMs can automatically modify the flag state based on certain conditions within that platform. Typically, APMs use triggers to shut down flags in pre-configured scenarios. For example, you can use an APM to monitor your system. If the error rate reaches 5%, the APM will call the trigger URL to disable (modify to OFF state) the feature flag.
CI/CD pipelines can also take advantage of flag triggers. You can use triggers when deploying code changes to turn a flag on or off automatically at the final stage of the pipeline. In addition, you can create your own automation algorithm and use triggers to control the flags in your application.
Create a triggers
Creating a trigger is a straightforward process. Follow the steps below:
- Access the Triggers tab.
- Click + Add Trigger.
- Select the Type. Currently, only the Webhook type is available.
- Choose the Action the trigger will perform. You can choose between turning the flag ON or OFF.
- Provide a description for the trigger. It's optional. However, the Bucketter team recommends always providing clear descriptions for easy maintenance.
- Click Save Trigger.
A new trigger will be displayed as in the image below, providing the Trigger URL. You must copy and store the Trigger URL to use in your application.

When you create a trigger, you will receive a Trigger URL. It's important to copy and store the URL in a safe place or use it directly on your APM. Once you leave the Trigger page, the URL cannot be recovered. If you access the Trigger page, the existing trigger URLs are limited to only five characters, which are displayed to enable you to identify each trigger.
The Trigger URL includes the authentication token, so all you need to do to enable the trigger is to perform a POST request using the Trigger URL. You must keep the Trigger URL safe and secure, as it contains sensitive information. Anyone with access to the Trigger URL can modify the state of your system flag.
In the event of a Trigger URL leak, the Bucketeer team strongly recommends that you immediately reset or delete the trigger. Otherwise, anyone with the Trigger URL can modify the state of your application.
Usage recomendations
When using Bucketeer, it's important to note that triggers don't receive any information from the Webhook request body. In simpler terms, all you need to do to execute a trigger is perform a POST request to the Trigger URL you received when creating the trigger. As a result, Bucketeer is unable to identify the source of the POST request. Therefore, if you're using different tools to manage the flag remotely, it's recommended that you create a distinct trigger for each tool. Doing this lets you easily identify the source of a flag turn-off.
Bucketeer has in its roadmap the objective to accept payloads in the Webhook body to enable you to provide additional information regarding the request source. Stay tuned for future releases.
Manage triggers
When you access the Trigger tab, you will have access to all existing triggers related to the current flag. The image provides an example of a flag associated with three triggers.
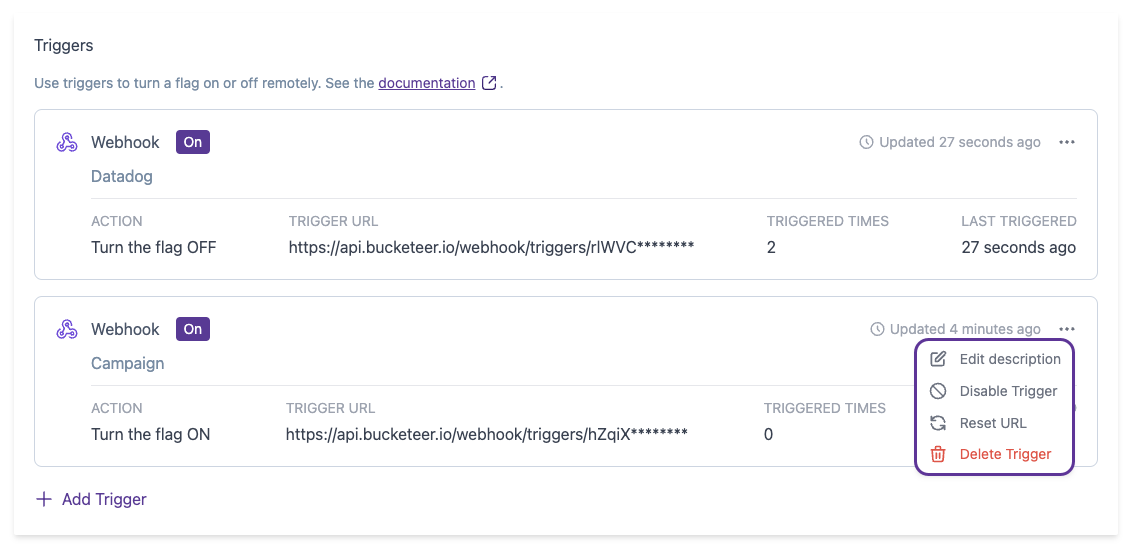
Each trigger presents the following information:
- Action: Specify if the trigger turns the flag ON or OFF when activated.
- Trigger URL: Part of the Trigger URL. As mentioned before, you only have access to the complete trigger URL at the time of trigger creation.
- Triggered Times: Inform the number of times the trigger was used and the associated action was performed.
- Last Triggered: Inform the date and time the trigger was last used.
- Last update: Inform you about the last time the trigger was updated. This field updates in case of triggers, reset URL, disable/enable, and description update events.
The Triggered Times and Last Triggered will be updated every time the trigger request is received, even if the flag state doesn't change. For instance, Triggered Times and Last Triggered will be updated even in the case when a trigger tries to turn OFF a flag that is already OFF.
Triggered Times and Last Triggered aren't updated, only in case the trigger is disabled when the trigger request is received.
After creating a trigger, you can perform four actions on it through the Bucketeer dashboard by clicking on the Action menu (...) located at the top right corner of the trigger card:
- Edit Description: Use this option to update the trigger description.
- Disable Trigger: Deactivate the trigger without removing or changing the Trigger URL. Despite receiving a POST request, the Bucketeer system will not execute the trigger action when disabled.
- Reset URL: Create a new Trigger URL. POST requests using the old Trigger URL will not change the flag state. When you reset the trigger, the Bucketeer system will provide a new Trigger URL. You should copy and store the Trigger URL to use in your application.
- Delete Trigger: Remove the trigger.
Resetting a trigger doesn't reset Triggered Times and Last Triggered information.
If you reset a trigger, the reset date will be displayed on the trigger card. This way, you can quickly check if a trigger was reset before and when it was done.
Test a trigger
You can make a POST request using the Trigger URL to test a trigger. The code block below presents an example of the code used to perform a request using curl:
curl -X POST https://api.bucketeer.io/webhook/triggers/MTQyMDY5OTI0ODc2MQw4yPzGndlkezFEsZE_uPnA