Event rate
The event rate condition is designed to turn off flags based on the usage rate. Some popular usage cases for these conditions are:
- Kill automatically flags causing high error rates.
- Turn off a flag you use to collect data for analysis. Therefore, the event rate condition can turn the flag off when enough data is collected.
- Disable a flag that has been visited a certain number of times. Each time a user visits the flag, you can send that event, allowing the system to turn it off for you when it reaches the threshold.
How the event rate works
The event rate condition triggers the operation when the frequency of a particular event reaches a specific threshold. For instance, whenever a user visits a flag, you can send an event through the SDK to track that visit. The Bucketeer system then receives these events and keeps track of the frequency of each flag variation. Thus, the system can evaluate the event rate and determine if it needs to turn off a particular flag.
To set up the event rate condition, you need to define the following configurations:
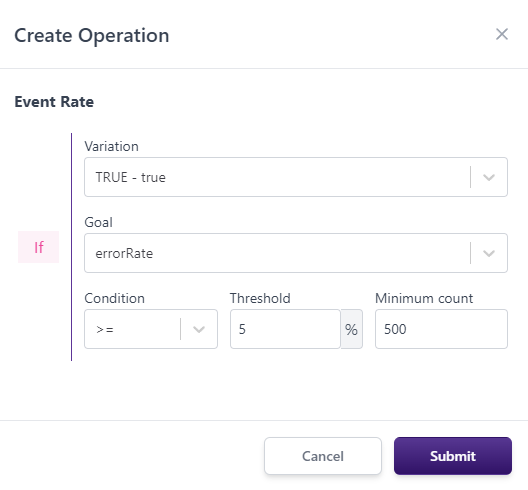
- Variation: The specific variation observed by the target user. The event rate will be calculated using the events called using this variation.
- Goal: The goal used to calculate the event rate. The counter of goal events will increase each time the goal is reached.
- Condition: The comparison operator used to assess the event rate. The available options are greater than or equal to (
>=) or smaller than or equal to (<=). - Percentage: The threshold for the event rate.
- Minimum Count: Minimum number of occurrences required for the condition to be enabled. This option ensures that the event rate is not triggered before a certain number of events happen, avoiding a false positive.
How the event rate is calculated
Bucketeer system uses the following formula to calculate the event rate:
Event Rate = (Unique Counter of Goal Events) / (Unique Counter of Evaluation Events)
Refer to the Experiments and Evaluations sections for a better understanding of the user count of goals and evaluations.
Setting up auto operation with event rate
To add an event rate condition to a feature flag, you need to follow the steps below:
- Go to the Operation tab on the feature Flag page details.
- Click the + New Operation and select Event Rate.
- Set up the conditions. Define the variation, goal, condition, threshold, and minimum count.
- Click Create Operation.
The image below presents an example of event rate configuration. The current configuration's objective is to turn off the feature flag in case of a high error rate above 5%. A minimum count of 500 is used to avoid misleading turn-offs.

Managing event rates
After creating an event rate, it becomes active and is available in the Operation panel. You can identify it by the Event Rate tag or the Kill Switch Operation type. The event rate progress information visually displays the current event rate percentage and includes:
- The associated goal.
- The minimum goal count.
- The total goal count events.
- The current event rate value.
The following image shows an example of progress information for a running event rate:

While active, you can edit, stop, or delete the event rate:
- Edit Kill Switch: Allows you to change the variation, goal, condition, threshold, and minimum count associated with the event rate.
- Stop Kill Switch: Stops the event rate and moves it to the Finished tab.
- Delete Kill Switch: Stops and removes the event rate information from the server. Use this option carefully. Only logs related to that event rate will be reported on the Audit Logs page.
Event rate lifecycle
When you create an event rate, it will be active and available in the Active tab of the Operation panel. The event rate (kill switch operation) continuously monitors the flag operation, counting every condition defined at its creation. When the threshold is reached, it will kill the flag, turning it off. Afterward, the event rate moves to the Finished tab.